Staging Material
The concept of staging is to provide a two-step method of issuing materials to Jobs or Sales Orders, as an alternate to directly issuing materials to a single Job or individual Sales Order.
Pre-Staging is the first step in the process, which allows for the moving of large quantities of raw materials from regular Inventory to Staging, which is a separate inventory segment, similar to WIP and QC Testing. In pre-staging, the user selects a list of the Jobs or Sales Orders that need to have materials pulled from inventory, usually based on the planned starting date of the Job or due to ship date for Sales Orders. The system combines the requirements for all the selected Jobs or Sales Orders, and sends the scanner user out to pull each material from inventory once, for all the Jobs or Sales Orders, rather than making individual trips for each one. Staging can provide a very efficient way of preparing materials for all Jobs that are due to start the next day, for example. During pre-staging the user will select the Parts and Lots to be staged and select the new Location to which they will be moved. Note that this does not result in materials being issued/reserved (that occurs during the second step, Final Staging) and therefore material in staging appears as On Hand in MRP reports*. (*
Final Staging, available for Production Jobs or Sales Orders, is the second step in the two-step staging process, and results in the material that was pre-staged being issued to the Production Job or reserved to the Sales Order. The process allows for the printing of Lot labels, so that measured components can be identified by Part Number, Lot number, quantity, Job/Sales Order number, and Master Lot number. The Job Reporting "Staged Inventory" report allows users to Final Stage the same Part on multiple Job lines, on multiple Jobs. This option is useful in situations where users need to weigh up Parts at the same time. If inventory has been pre-staged for Sales Orders, users will reserve inventory to each Sales Order individually.
The Staging Job type, via Inventory > Issue/Reserve Inventory is useful in situations where customers want a two-step issue process for Jobs. For example, in the first step someone stages directly to the Job (where the system will tell them the items and quantities needed). In the second step someone dumps what is staged to the actual machine. The user will be forced to scan what is dumped in (so that the system prompts if more/less quantity is issued, the wrong Part Number is scanned, or an item is missing). When selecting the "Staging Job" option, the system allows staging to one Job. This takes into account everything that was issued and staged to the Job. Once this staging is done, users will be able to perform final staging of only the lots that were previously staged via WMS > WMS Transactions > Final Staging. The Staging Sale type, via Inventory > Issue/Reserve Inventory is useful in situations where customers want a two-step issue process for Sales. The process is the same as documented above for the Staging Job type.
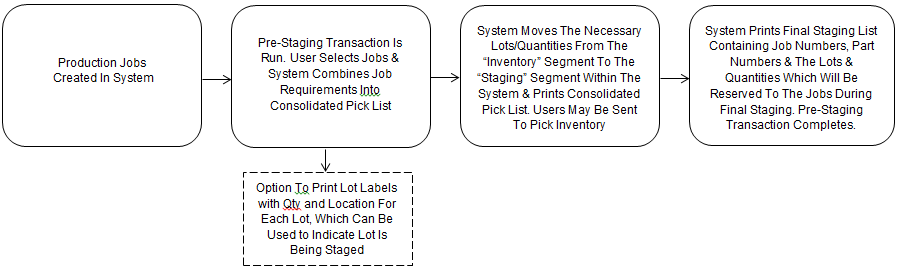
The diagram below outlines the pre-stage process for production jobs. Note: Jobs and Cash Disbursement Summary may be pre-staged on handheld scanners using the Pre-Stage Job and Pre-Stage Sales transactions.
The following security settings should be reviewed for users who will perform staging in DEACOM:
- "Production -- final stage without full requirements" - Allows users to final stage even if all required materials were not pre-staged. If the this security is set to yes, the user will receive a prompt "The requirements for the job have not been fully pre-staged, are you sure you want to final stage?". If this security is set to "No", the system will display a prompt indicating the user needs the appropriate security and will not allow the staging process to continue.
- "Inventory -- final stage by master lot" - Allows the user to issue by picking/scanning a Master Lot without going lot by lot. If a Master Lot label is scanned and "Next" is clicked, final staging of all the inventory in that Master Lot will occur. This allows users to use a pallet by pallet approach when scanning/issuing. If the security setting is set to "No", the current functionality will happen, namely if a user scans a Master Lot label, it sets the Master Lot combo box to what was scanned and filters down the available lots. This allows the user to verify that the Master Lot that was created is correct by final staging each lot in that Master Lot. This is important in multiple iteration final staging.
- "Inventory -- final stage expired lots" - Allows users to final stage lots that have expired after they were pre-staged. This setting applies to both the main application and WMS. If a user does not have this security, they will not be able to final stage expired lots. The lots will be removed and the user will be prompted with the following message: "The following lots are expired, please un-stage them and pre-stage new lots."
Configuration
The following configuration covers the requirements for staging material:
In Inventory > Options > Staging tab:
- Determine if lot information will be printed at any point in the staging process or only when performing the last iteration of final staging via the "Include Staged Inventory On Documents" field.
- Check the appropriate flags regarding final staging.
- Set how the information contained on the various Report Layouts should be sorted using the "Sort Pre-Staging By" and "Sort Final Staging By" fields.
- Set how Lots may be chosen from various Facilities using the "Pre-Staging Inventory" field.
In Inventory > Options > WMS tab:
- Determine the various Lot Chooser form defaults using the "Show Lot Chooser", "Filter Lot Chooser", "Sort Lot Chooser By", "Lot Chooser Type", "Lot Chooser QC", and "Lot Chooser Select" fields.
- Determine how inventory and specific Lots should be suggested using the "Suggest Lots", "Suggest By", and "WMS Lot Priority" fields.
In Sales > Options > Other tab:
-
Set how many staging counts will occur for Sales Orders and Inter-Company Transfers using the "SO Staging Counts" and "ICX Staging Counts" fields respectively.
In Production > Option > WIP tab:
- Set how many counts will occur for Jobs using the "Job Staging Counts" field.
- Note: Job Staging Counts may also be set on Job Categories
Optional. On BOM Lines for items that will be final staged to jobs
-
On the General tab, enter a QC Test in the "QC To Continue" field that must be performed before items on subsequent BOM lines will be displayed in the "Part Number" field when final staging to jobs in the main and WMS applications.
In addition to the above settings, for users to be able to stage material, the following must be true:
- One or more Sales Orders must be open and not yet shipped. Refer to Entering Sales Orders for information on the various methods used to enter Sales Orders.
- One or more Jobs must be open. Refer to Entering Production Jobs for information on the various methods used to enter Jobs.
- There must be inventory on hand. The number of available Lots and quantity in each can be verified using an Inventory "Lots" report with a "View" of "On Hand". Refer to Inventory Flow and Reporting for more information on reporting options.
- Report Layouts, such as the Sale Staging 1 and 2 and Staging Picklist, must have the appropriate information embedded on the report itself and in the barcodes used on the documents. Refer to Managing Report Layouts for general information.
- WMS scanners that will be used to perform transactions must be properly set up and have the DEACOM software installed. Refer to WMS Installation for complete information.
Any additional configuration is included in the Process section below.
Process
Pre-Staging material using the main application
- Navigate to Inventory > Pre-staging.
- Select a "Transaction Type" and set the "Type" to "Staging".
- Set the "Date Based On" and Dates to the range of orders to be pre-staged.
- Check off the "Print Picklists" and "Print Lot/SO Labels" flags as desired. Also, make the appropriate selection in the "Short Inventory" field.
- Click "View".
- In the Mover form, select the orders to be pre-staged then click "Continue".
- Modify the lots to be selected, set the quantity to the pre-staged amount, click "Apply".
- Continue through all the requirements of all the orders selected.
- Once all lots have been selected, click "Continue". The system will then perform the actions indicated in the list below:
- Combine the requirements for the selected orders.
- Move the necessary lots/quantities from the "Inventory" segment to the "Staging" segment within the system (If the "Retain Current Location" box was not checked on the pre-filter, the system will first attempt to use the chosen Facility's default Location and then the Item Master's default Location when processing the selection of lots during pre-staging).
- Display the Copies to Print form which allows users to print the consolidated Pick list in order to begin the picking process.
- Print the "Final Staging List" using the same "Print To" value selected when printing the consolidated Pick list.
Notes:
- If there is not enough inventory to fulfill all lines on all selected orders, no inventory will be staged. The sufficient amount of inventory for all selected orders must be on hand to stage.
- Once lots have been pre-staged, they may be selected during the shipping process, via Modify > Select Lots in the Ship > Sales transaction, provided the lots are not in the middle of the Final Staging process. See the OutBound Inventory page for information on selecting lots during shipping.
-
-
-
Pre-Staging material using WMS
- Navigate to Pre-Stage Job or Pre-Stage Sales. These pre-filters are used to search for an individual Job/Sales Order or a group of Jobs/Sales Orders that will be moved to Staging.
- Once a selection is made, click "Stage".
- The system will display the Job Picker or Sales Order Picker form with a "Type" combobox. This form is used for the selection and confirmation of which Jobs/Sales Orders will be included in the staging process.
- On the Pre-Staging form, select the appropriate lots and quantities needed to complete the selected Jobs/Sales Orders.
- Click "Save". The system will stage the selected lots to all selected Jobs/Sales Orders.
When only one sales/job is selected for pre-staging, staged quantities will be tracked so that the "Lot Quantity" field will accurately reflect what has already been entered or scanned for pre-staging. This is useful in situations where customers will pre-stage to orders over longer periods of time.
Notes:
- If there is not enough inventory to fulfill all lines on all selected orders, no inventory will be staged. The sufficient amount of inventory for all selected orders must be on hand to stage.
- Once lots have been pre-staged, they may be selected during the shipping process, via Modify > Select Lots in the Ship > Sales transaction, provided the lots are not in the middle of the Final Staging process. See the OutBound Inventory page for information on selecting lots during shipping.
-
-
Pre-Staging material using Master Lots
Users have the option to include lots in Master Lots for pre-staging provided the inventory option flag "Include Lots in Master Lots During Pre-Staging" is set to true. This flag is available on the Staging tab via Inventory > Options. The process pre-staging lots within master lots is detailed below.
- Navigate to Inventory > Pre-Staging.
- Set the Transaction Type to "Sales Orders" and the Type to "Staging."
- Select an Order Type, Inter-company Transfer, Sales Order or All.
- Fill in the pre-filter with any additional selections.
- Click the "View" button to display the Select Order(s) To Stage form.
- Move the appropriate orders to the right hand side of the form using the "Move" and "Move All" arrows.
- Click "Continue" to display the Apply Inventory form. Notice that the list will contain lots that are within Master Lots. You may have to scroll down to see these lots. If necessary, the Master Lot number (fi_masterlot) can be added to the Apply Inventory grid.
- Select the appropriate lot and click the "Modify" button to display the Select Quantity form and select the correct quantities.
- Click the "Save" button on the form once the correct quantities have been selected.
- Repeat steps 7-8 if necessary to select additional quantities.
- Click the "Apply" button on the Apply Inventory form.
- The system will display the Inventory To Stage form confirming the lots and part number that are to be pre-staged.
- Click "Continue" to display the Copies to Print to form where the sales staging picklists can be printed if desired.
Note: If using the "Include Lots in Master Lots During Pre-Staging" flag all lots within a Master Lot must be pre-staged at the same time. When selecting a specific lot within a Master Lot and performing the pre-stage transaction the system will pre-stage all lots within the Master Lot simultaneously.
Final Staging material using the main application
- Navigate to Inventory > Final Staging.
- Set the "Type" to either "Job" or "Sale", depending on what is being staged.
- Select the Job or Sales Order Number using the search box.
- Select the desired Part Number using the search box.
- If "Group By Part Number In Final Staging" is checked in Inventory > Options > Staging tab, the "Quantity" field will populate with all quantity required by the Job for the selected Part. This means that if the same Part is included multiple times on the Job or Formula used by the Job, all required quantities of that Part are summed together and used to populate the "Quantity" field.
- If "Group By Part Number In Final Staging" is not checked in Inventory > Options > Staging tab, selecting a Part will make a "BOM Sequence" field appear. Select the Part's BOM Sequence for which staging should occur from this pick list, which will force the "Quantity" field to populate with the quantity required by the selected BOM line. This means that if the same Part is included multiple times on the Job or Formula used by the Job, each BOM line will need to be staged separately.
- If using the "QC To Continue" field on BOM Lines, reference the Edit BOM Line form section to see how this field may impact the list of materials displayed for staging in this field.
- Use the pick list in the "Location" field to select the appropriate location based on the final staging list that was printed as a result of the pre-staging process.
- Select the appropriate lot in the "User Lot" field as displayed on the final staging list. Note:
- Ensure the correct quantity to be staged as indicated in the "Quantity" field. When final staging both jobs and sales orders, the default is based on the option selected in the "Default Final Stage Qty" field via Inventory > Options > Staging tab.
- If desired, select a New Location Type and New Location.
- Ensure the "Print Lot Label" box is checked.
- Click the "Apply" button to complete issuing the lot for this item to the selected Job.
- If additional parts will be staged to this Job/Sales Order, use the pick list in the "Part Number" field to select the next part and repeat steps 1-10. Note that when a new Part Number is entered or scanned into the "Part Number" field, the "Lot Number," "Quantity," and "Formula Required" field will be updated automatically based on the Part Number entered.
Notes:
- The system will not display a confirmation message after all parts have been final staged/issued to the job. However, if a part has already been issued, the system will indicate this if the part is selected again in the "Part Number" field.
- Master lots can be selected on the Final Staging form when staging jobs regardless of the selected iteration if the user has the "Production -- Final Stage without Full Requirements" security set to yes.
- The "Print" button can be used to print documents and document groups for the selected job or sales order.
-
-
Users also have option of weighing materials/lots during the final stage process. In this case, the value in the "Quantity" field on the Final Staging form will be supplied by the scale. The Gross and Tare weight of lots may also be captured during weigh up. In situations where users need to use different scales, for example, when weighing items of different sizes and dimensions, the "Scale Model" field on the Final Staging form maybe used to select another Scale Model. This field is only available in the main application. Additional information is available via the Scales page.
Gang Weigh Staging
Gang Weigh Staging is a form of Final Staging used mainly in situations where users need to weigh up and final stage parts at the same time, often when the same part is contained on multiple job lines, on multiple jobs. The process is performed by using the "Final Staging Job" button located at the top of the Staged Inventory report since this report shows pre-staged inventory quantities by part for all job lines displayed in the list.
- Navigate to Production > Job Reporting.
- Select a Report Type of "Staged Inventory."
- Fill in the pre-filter with any additional search criteria necessary.
- Click the "View" button to display the "Staged Inventory" form.
- Select the appropriate Job and click the "Final Staging Job" button to display the Final Staging form.
- All the fields are defaulted based on the part/job line selected in the report.
- At this point, Final Staging can be performed as normal using the process discussed in the previous section. When the "Apply" button is clicked on the Final Staging form, the form updates to the next line on the grid. Users may also click the "Next" or "Previous" buttons without clicking the "Apply" button. In this case, the system will display the following prompt: "Do you want to commit this transaction before proceeding?" If the user clicks "No" inventory will not be final staged and the form will update to the next line on the grid.
Final Staging material using WMS
Final Staging
- Navigate to Final Staging.
- Scan or manually enter the Job/Sales Order Number, which should automatically populate the "Part Number" field.
- Scan or manually enter the Location Type and Location.
- Verify the Lots that are automatically selected or manually select different Lots.
- Once all information is verified, click "Save", which will open the Stage Parameters form.
- On the Stage Parameters form, either check off the "Retain Location" flag or choose a New Location Type and New Location.
- Confirm all details then save.
Understanding the stage parameters and options
- If an incorrect part or lot is scanned during Final Staging, the system will display a prompt indicating that the scanned lot or part number has not been staged.
- If for any reason all of the job(s) requirements have not been staged, independent of the scenario described in point 1 above, the system will display a warning message after the "Save" button has been selected asking if the user wishes to continue.
- Items in final staging are presented and sorted on screen by their BOM sequence order.
- If scanning Master Lots, the system checks to see if the Master Lot exists in the current list and if there are balance left. If there are, and commit on scan is enabled, the system will stage all of lots in this Master Lot. If commit on scan is disabled, the system will set the part to the first part in Master Lot list that has a remaining balance.
- If using the "QC To Continue" field on BOM Lines, reference the Edit BOM Line form section to see how this field may impact the list of materials displayed for staging in the "Part Number" field.
- View Reqd button displays the list of the quantities of the materials or components required to complete the Job based on its BOM. This is only enabled when Type is set to "Job."
-
-
-
Staging Across Facilities
The Staging Across Facilities feature, only available in web versions of DEACOM, was designed to support production scenarios where job finishing occurs in multiple stages in more than one Facility in DEACOM. The typical example is a bulk Job process. Stage 1 of the process might include building a group of the required materials in Facility 1, then transferring those materials to Facility 2 to be blended. Once these materials are weighed and verified, they are allocated for that Job and cannot be used for any other. The process in DEACOM is to issue materials to the Job to remove them from available inventory, then transfer those materials to the second Facility for additional processing. See Staging Across Facilities for more information.
Note: The "Final Staging" transaction in the WMS Applications contains logic to check for Staging Across Facility scenarios. When a job with staged material is scanned, the system will check if the user has security for Inventory -- Stage inventory across facilities. If so, the system will allow allow the job to be selected, but suggest inventory from the scanner's current facility on the scanner not the job's facility.
FAQ & Diagnostic Tips
Tips:
- The "Apply" transaction will not occur automatically when a user scans a lot in during Final Staging. When a lot is scanned, and the "Scan Lots" box is checked on the Final Staging form the cursor jumps to the "Quantity" field which can then be entered or scanned into this field. Once this is complete, users will click the "Apply" button to complete the staging process. Previously, users where required to scan/enter the quantity or weight of lot first before scanning/entering the lot number. Customer experience indicated that users would want to confirm the lot# before starting to weigh the product. If it's the wrong lot #, customers don't want to remove the product from the scale, and put it back in the container.
- Job Categories in DEACOM contain an option to require e-signatures when issuing or staging items to jobs assigned to the selected category. If an e-signature is required, the system will present a form for the e-signature authentication. Authentication does not have to be done by the user currently logged in but does require the authenticator to have a valid DEACOM login. Postings occur as the signing user and not the logged in user. This option applies to the main application and WMS application.
- An inventory Facility is no longer required when staging inventory by master lot.
- insufficient inventory messages may be turned off when issuing or reserving in the WMS application via the "Suppress Insufficient Inventory Prompt on WMS" field on the Inventory > Options > WMS tab.
- During Final Staging, the system will prompt the user with a list of any parts that are not fully pre-staged.
Tip:
Tip:
How can I verify the lots that were pre-staged?
Run an Inventory report with a Report Type of "Lots" and a view of "Staging".
How does the quantity field on the Final Staging form refresh when using a scale to final stage?
When reading the quantity from the scale, after clicking the "Apply" button to final stage the quantity, the "Quantity" field value will be cleared from the scale.
Can expired lots be final staged?
Yes, provided users have the "Inventory -- final stage expired lots" security setting set to yes.
How can I determine what materials are in staging, for what job, and what material may need to go back to inventory?
Run a lots report with a view of "Staging" and add the following expression to a user-defined column in the grid: SQLVAL("st_jobnum","dtstaging","st_figroup = " + ALLT(STR(grpnum,15,0)),"S")
This will allow users to make the determination of what material should remain in staging and what material should be placed back in inventory.
Can lots be pre-staged in Make To Order scenarios?
Yes,